Configuring Data Validation
The Data Validation stage validates the migrated data using an automated validation stage to certify a successful migration. The specified aggregate functions or cell-by-cell functions are applied to all tables or specific tables and their columns to compare data between source and target data sources.
Data validation can be performed on:
- Table: Both the source and target datasets are available in the form of tables.
- File: Both the source and target datasets are available in the form of delimited files.
- File and Table: If the source datasets are in table format and the target datasets are in delimited file format, or vice versa.
To configure the Data Validation, follow the below steps:
- In Validation Type, select Data to validate the dataset.
- In Data Availability, select:
- Table: If both the source and target datasets are available in table format.
- File: If both the source and target datasets are available in delimited files.
- File and Table: The source datasets are in table format and the target datasets are in delimited file format, or vice versa.
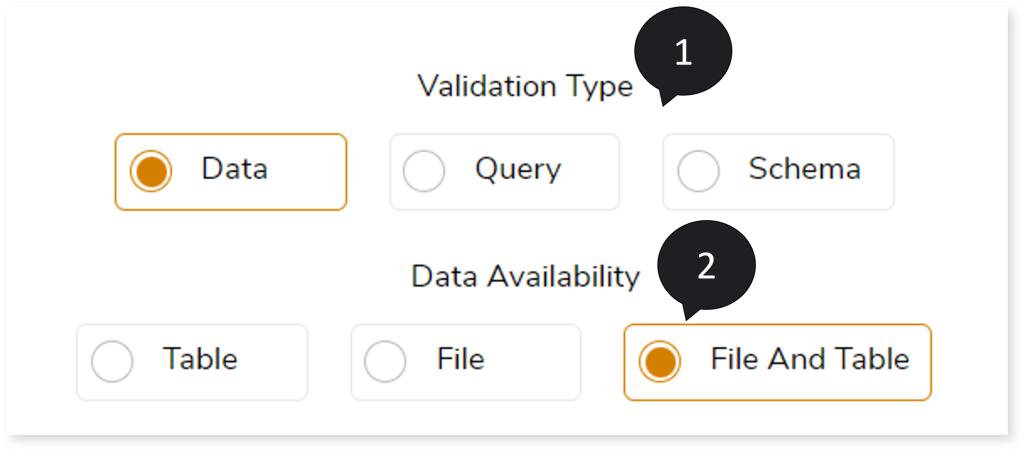
Configuring Data Validation: Table
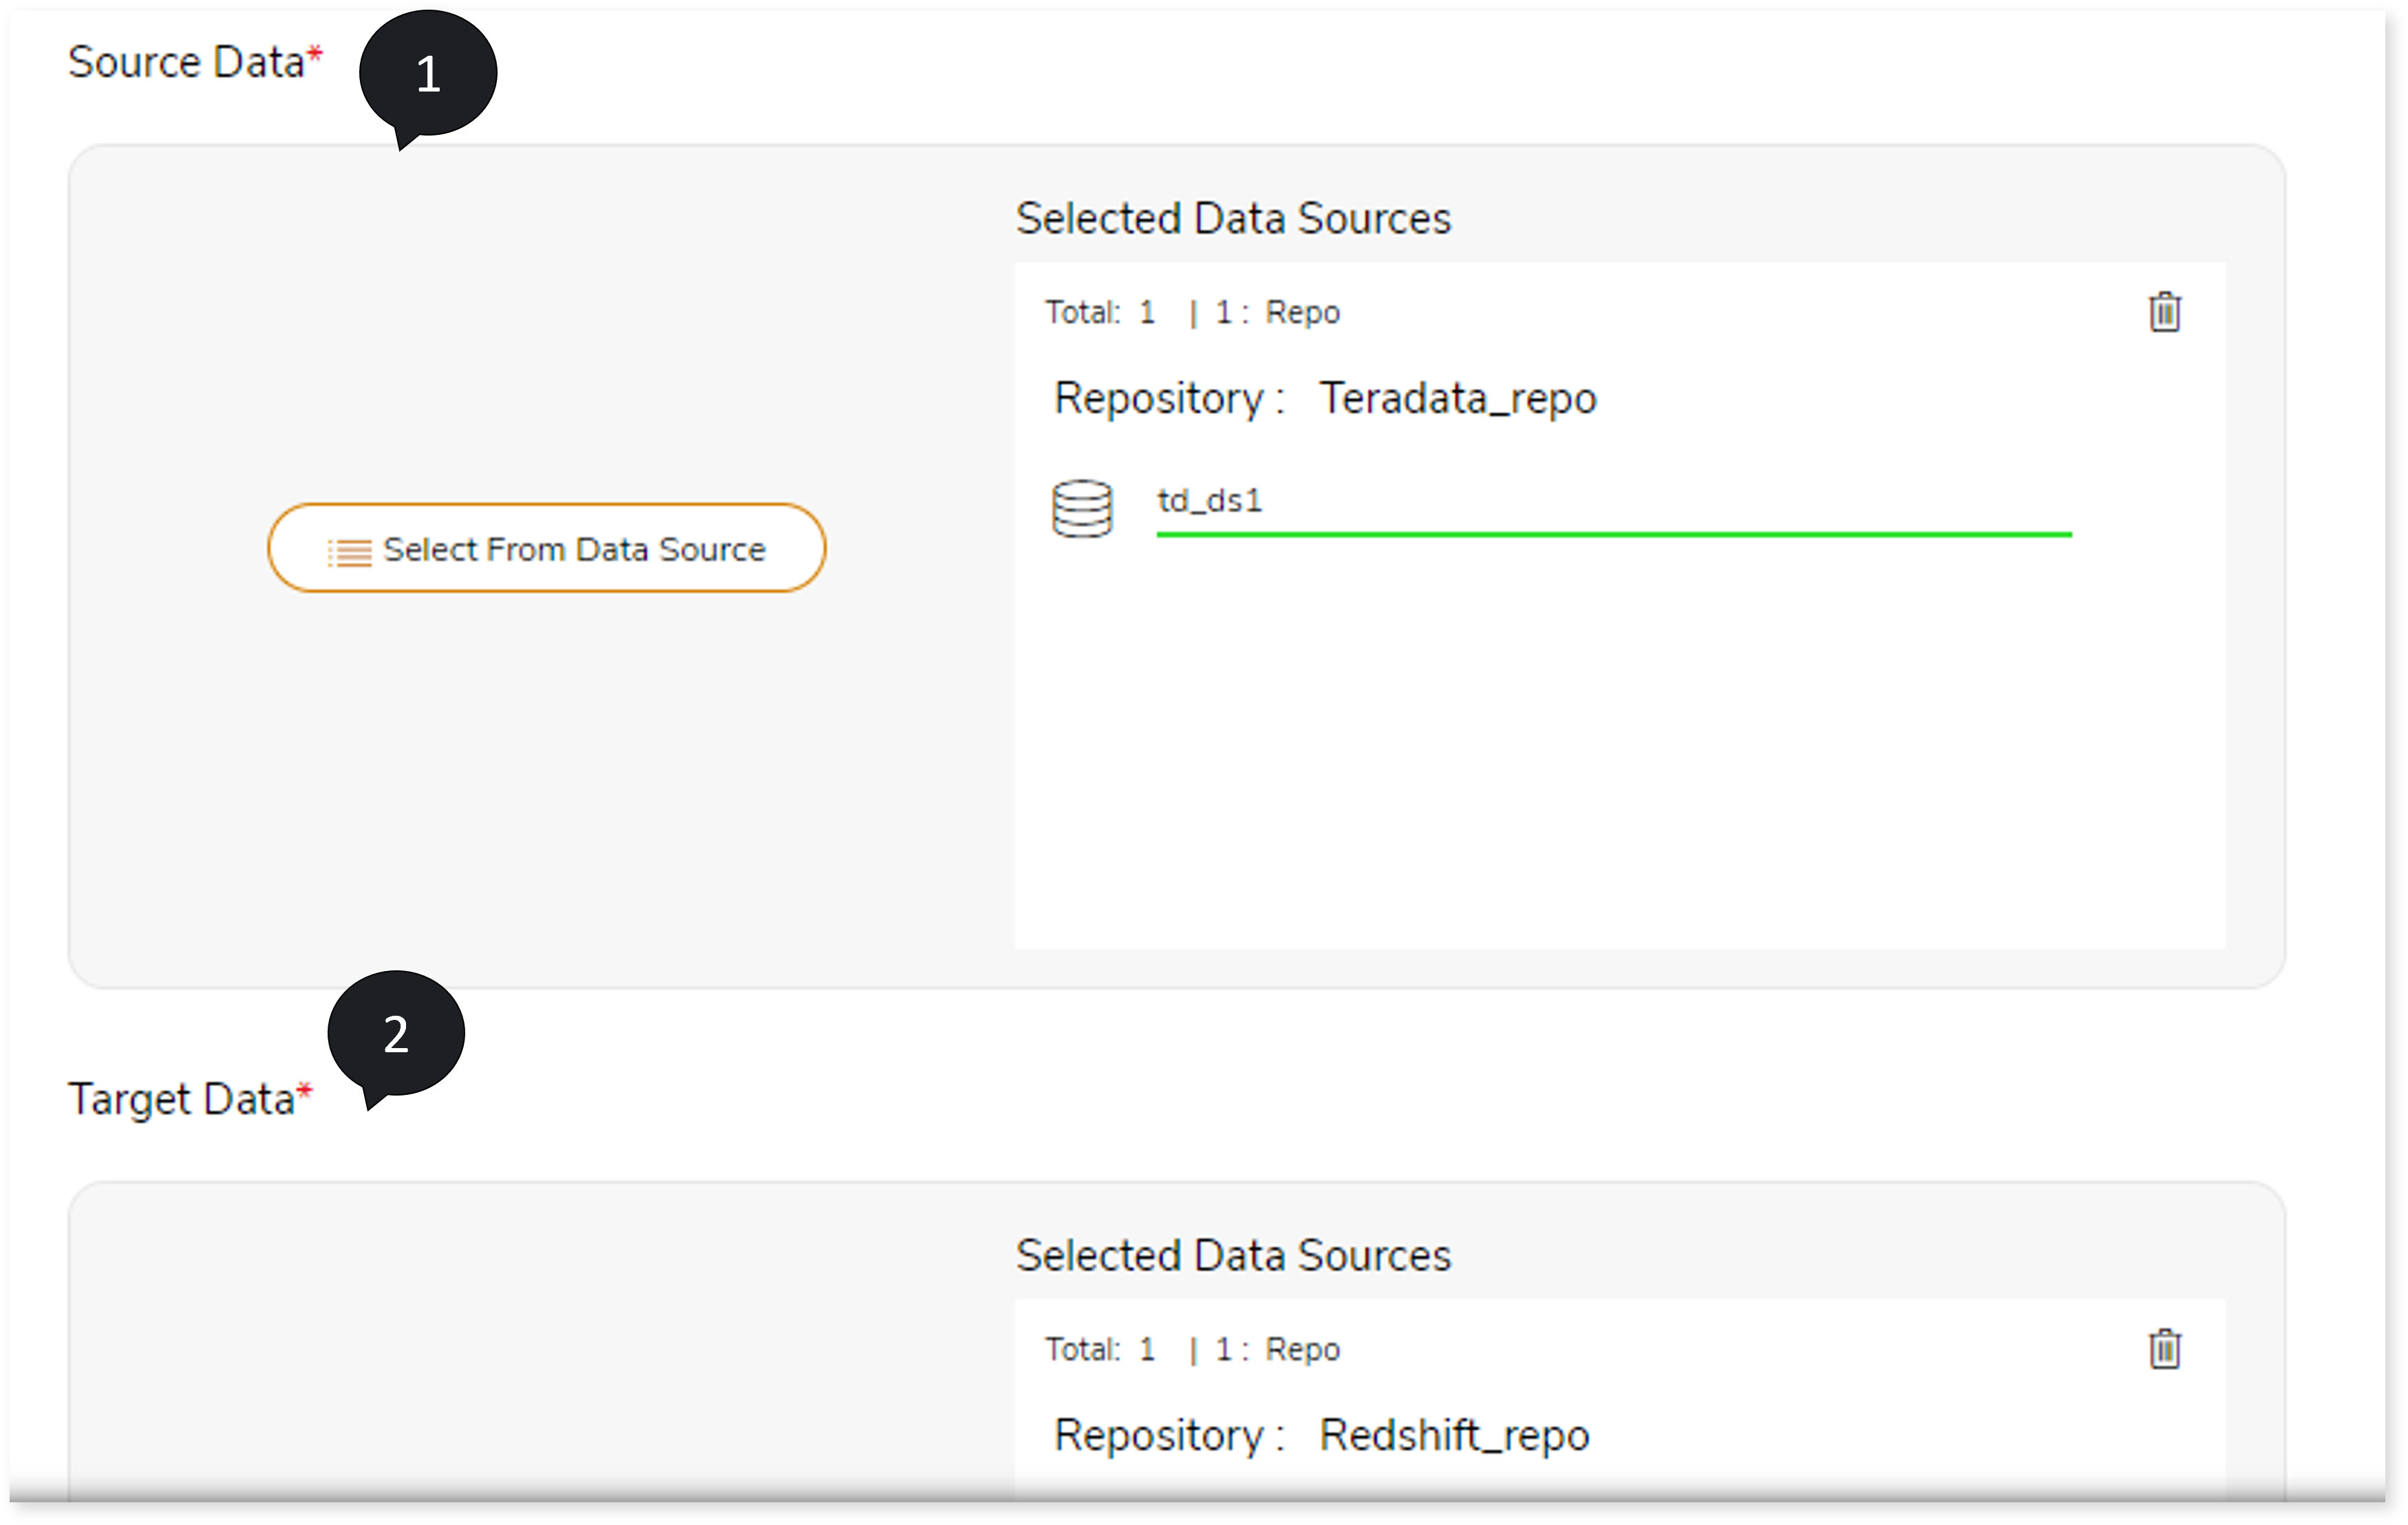
- In Source Data, select the source data location. To do so, follow the below steps:
- Click Select From Data Source .
- Choose repository.
- Select data source.
- Click
 to save the source data source.
- In Target Data, select the target data location. To do so, follow the below steps:
- Click Select From Data Source.
- Choose repository.
- Select data source.
- Click
 to save the target data source.
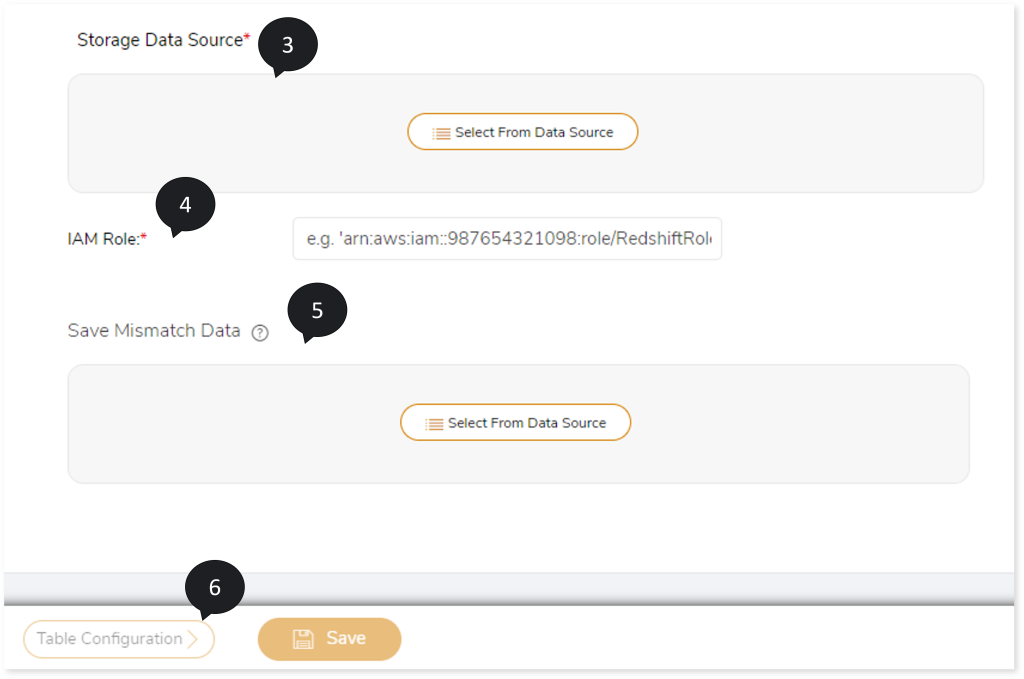
- In Storage Data Source, select the storage location. To do so, follow the below steps:
- Click Select From Data Source .
- Choose repository.
- Select data source.
- Click
 to save the storage data source.
- Enter the IAM role.
- In Save Mismatch Data, select the location where you need to save mismatched data after validation. To do so,
- Click Select From Data Source.
- Choose repository.
- Select data source.
- Click
 to save the data source.
- Select the Table Configuration to configure the table.
- Choose the Category as:
- Table: Based on the actual table data, validation is performed.
- Custom Query: After the query is executed on both the source and the target, validation is performed on the result set.
- In Data Source Mapping, map the source-to-target table. To do so,
- In Source Data, select the required source.
- In Target Data, select the required target.
- In Table Mapping, select the categories such as Default, Prefix/Suffix, or Custom.
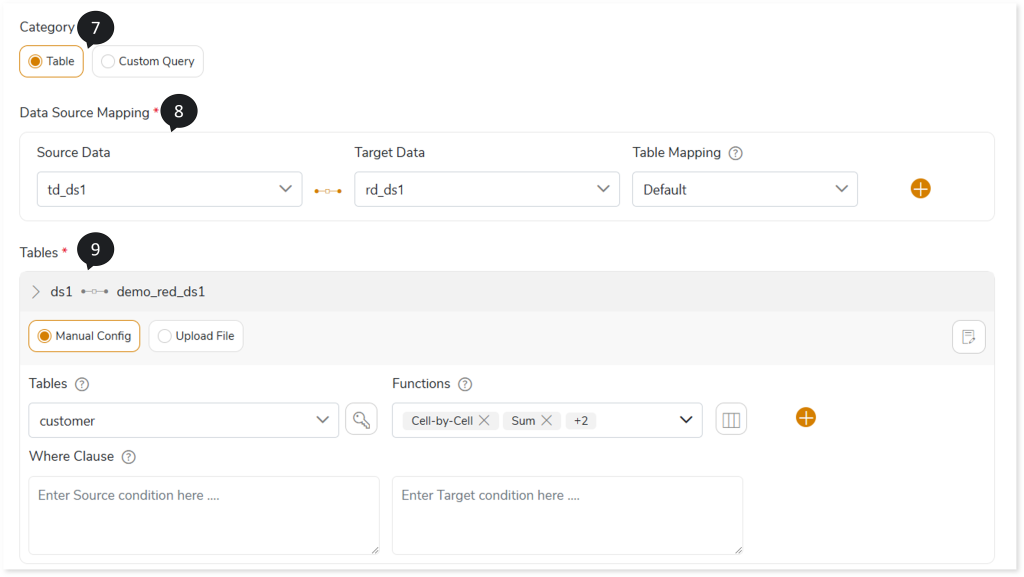
- If the selected Category is Table apply the specified functions on the tables for validation. You can validate the tables using Manual Config or Upload File option.
Manual Config
Here you can apply functions manually to the tables for validation. To do so,
- In Tables, select the table name to which you need to apply functions. To define Key Columns to the specific columns in the table:
- Click
 .
.
- Select the required key column(s) and change data column(s).
- Click Apply to update it.
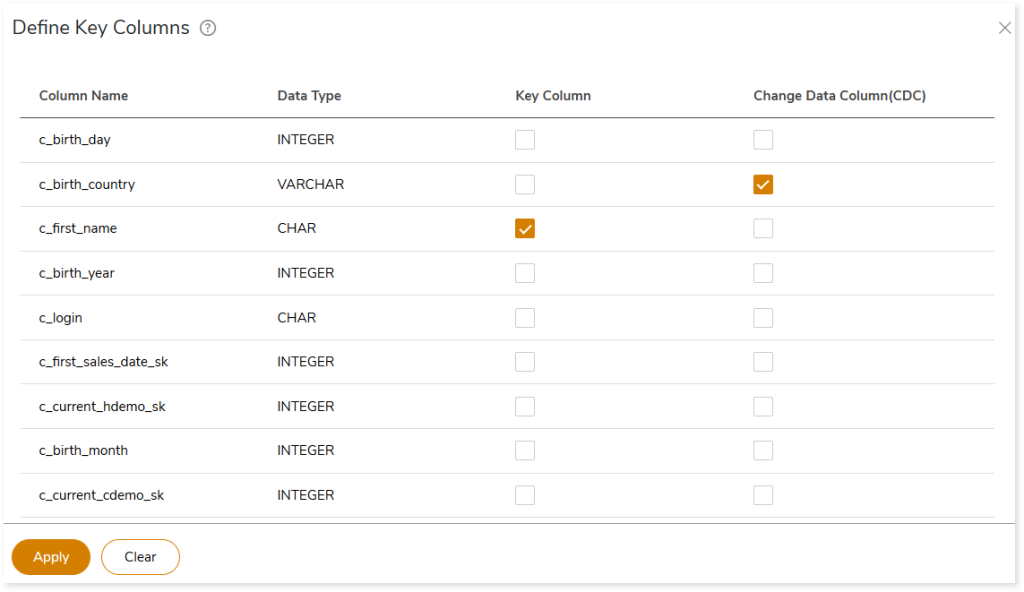
Key column: Function as a base column to perform cell-by-cell validation. If key column is not selected, the system will perform cell-by-cell validation using the primary key in the Source data.
Change Data Column (CDC): CDC is used to perform cell-by-cell validation in the audit tables. It helps to sort table rows with the key column value to generate a unique row number in the audit table. To validate audit table combination of the key column and CDC is used as base column. If the key column is not provided the system will use the primary key instead of the key column. In absence of a primary key the CDC will not work.
- In Functions, select Cell-by-Cell or required aggregate functions to perform validation on the specified dataset.
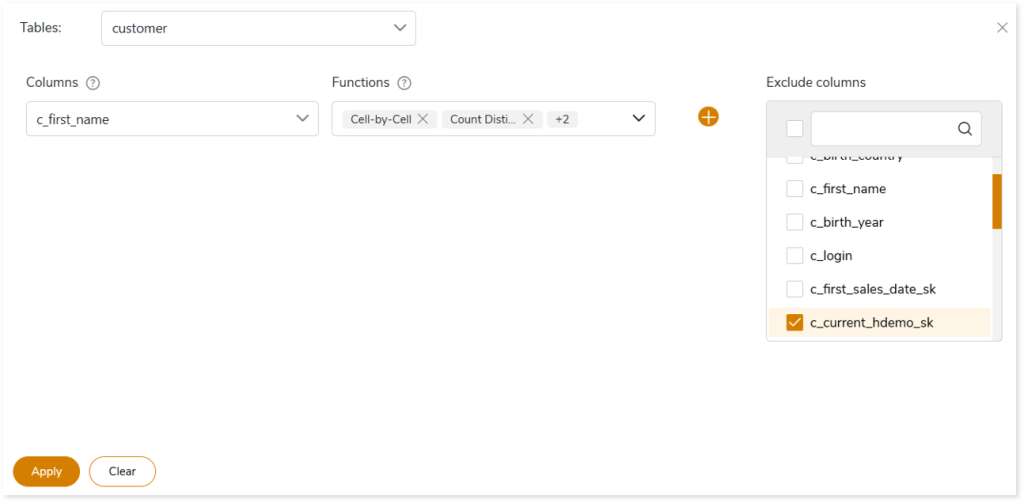
- Click
 to select multiple or specific columns to include or exclude columns from validation. To include or exclude the columns, follow the below steps:
- In Columns, choose the column name for validation.
- In Functions, choose the required aggregate functions to perform validation on the specified dataset.
- In Exclude columns, choose the column name to exclude from validation.
- Click Apply to update it.
- In WHERE Clause, enter the source and target WHERE clauses which allows you to filter tables according to the specified condition. (Enter the condition without a WHERE clause or a semi-colon, for example: city_id=”Delhi” or salary=50000).
- Click
 to add more entities to validate.
- Click
 to configure various config rules for specific tables or columns, such as trim, round (2), case insensitive, etc. For example, in case insensitive rules, the system ignores case sensitivity and recognizes the same value in the source and target.
Upload File
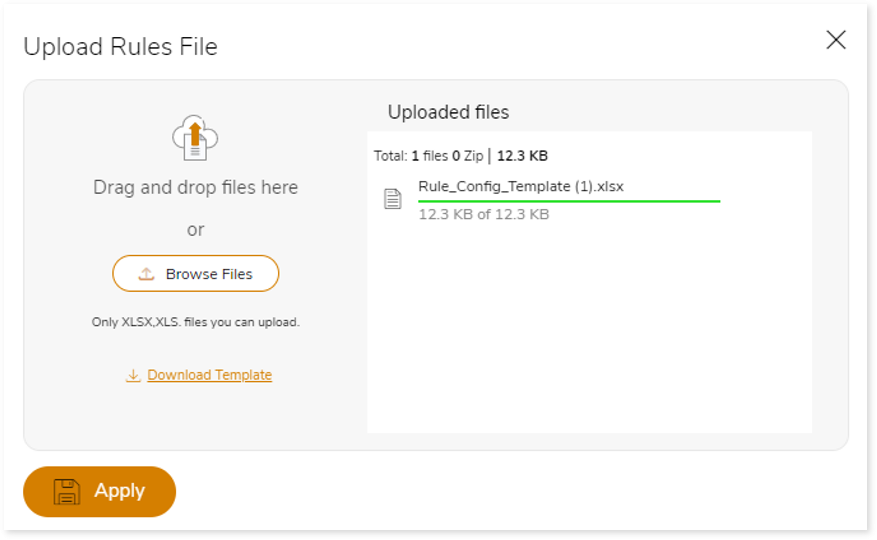
Here you can upload the table mapping-rule configuration file to configure the tables for validation. Table mapping configuration files should define the name of the tables and the functions. You can also apply config rules, such as trim, round (2), case sensitive, etc., that need to be applied to specific tables or columns.

The following table depicts the config rules and their descriptions:
|
Rule |
Description |
Applicability |
|
Case_Insensitive |
This rule allows you to compare cell value with case insensitivity enabled.
For example: Let's assume a use case where the value present in the source column is "PROFFESOR" and in target, it is "Professor".
With you apply this rule, this cell will be marked as "Conditional Matched". |
Applicable to columns with VARCHAR and STRING data types only. |
|
Null_vs_Blank |
This rule allows you to match blank string and Null.
For example: Let's assume a use case where the value present in the source column is NULL and in target, it is ''
With you apply this rule, this cell will be marked as "Conditional Matched". |
Applicable to columns with VARCHAR and STRING data types only. |
|
Trim |
This rule allows you to compare cell value after removing space (both before and after value).
For example: Let's assume a use case where the value present in the source column is " Professor " and in target, it is "Professor"
With you apply this rule, this cell will be marked as "Conditional Matched". |
Applicable to columns with VARCHAR and STRING data types only. |
|
Round(n) |
This rule allows you to compare cell value after rounding off to n decimal points.
For example: Let's assume a use case where the value present in the source column is "0.856" and in target, it is "0.857".
With you apply this rule, this cell will be marked as "Conditional Matched". |
Applicable to columns with NUMERIC data types only. |
|
Regexp(regex) |
This rule allows you to compare cell value as per regular expression applied on source and target. The Validation engine executes the regular expression on the target, hence, input target-specific expression only. |
|
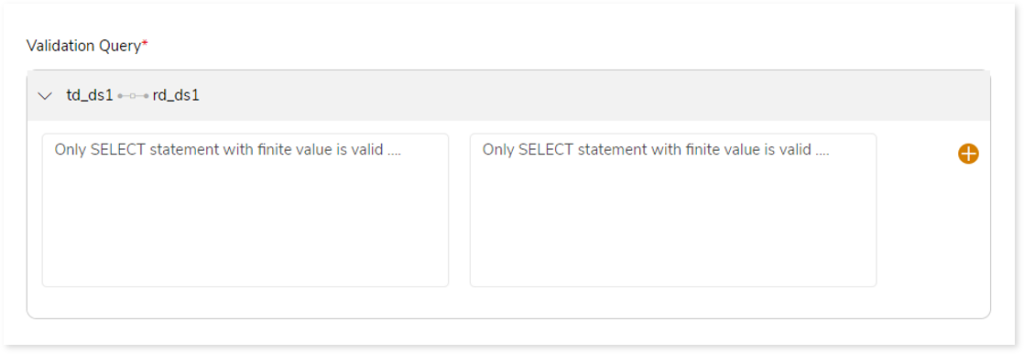
If the selected Category is Custom Query, then enter SELECT query statement in both the Validation Query fields. After the query is executed on both the source and target, validation is performed based on the result set.
- Choose the On-Error option, based on which you can Continue or Stop the validation whenever the system encounters an error.
- In Custom properties, enter the key and value.
- Click Save to save the Validation Stage. When the Validation stage is successfully saved, the system displays an alerting snackbar pop-up to notify the success message.

Configuring Data Validation: File
To configure the file-to-file validation, follow the steps below:
- In File Type, select Delimited File if the data in the file is separated by a field separator character such as Hash {#}, Colon {:}, Comma {,} etc.
- In Source File, select the source file location. To do so, follow the below steps:
- Click Select From Data Source.
- Choose repository.
- Select data source.
- Click
 to save the source data source.
- In Target File, select the target file location. To do so, follow the below steps:
- Click Select From Data Source.
- Choose repository.
- Select data source.
- Click
 to save the target data source.
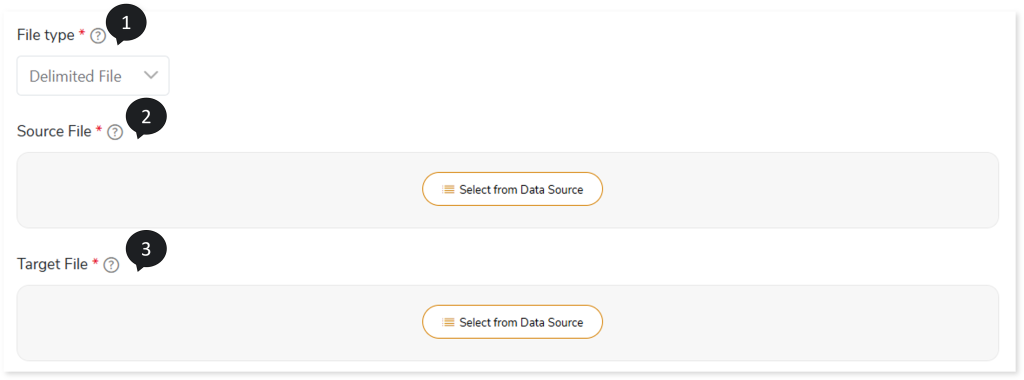
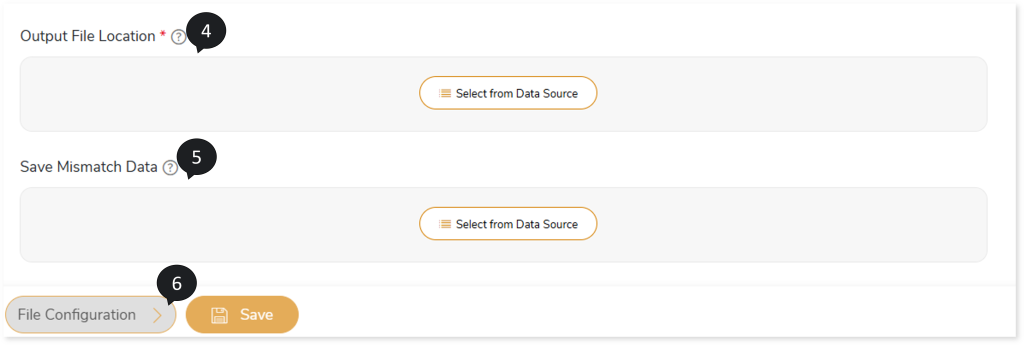
- In Output File Location, select the output file location where you need to save output file after validation. To do so, follow the below steps:
- Click Select From Data Source.
- Choose repository.
- Select data source.
- Click
 to save the target data source.
- In Save Mismatch Data, select the location where you need to save mismatched data after validation. To do so, follow the below steps:
- Click Select From Data Source.
- Choose repository.
- Select data source.
- Click
 to save the target data source.
- Click File Configuration to provide more details about the files.
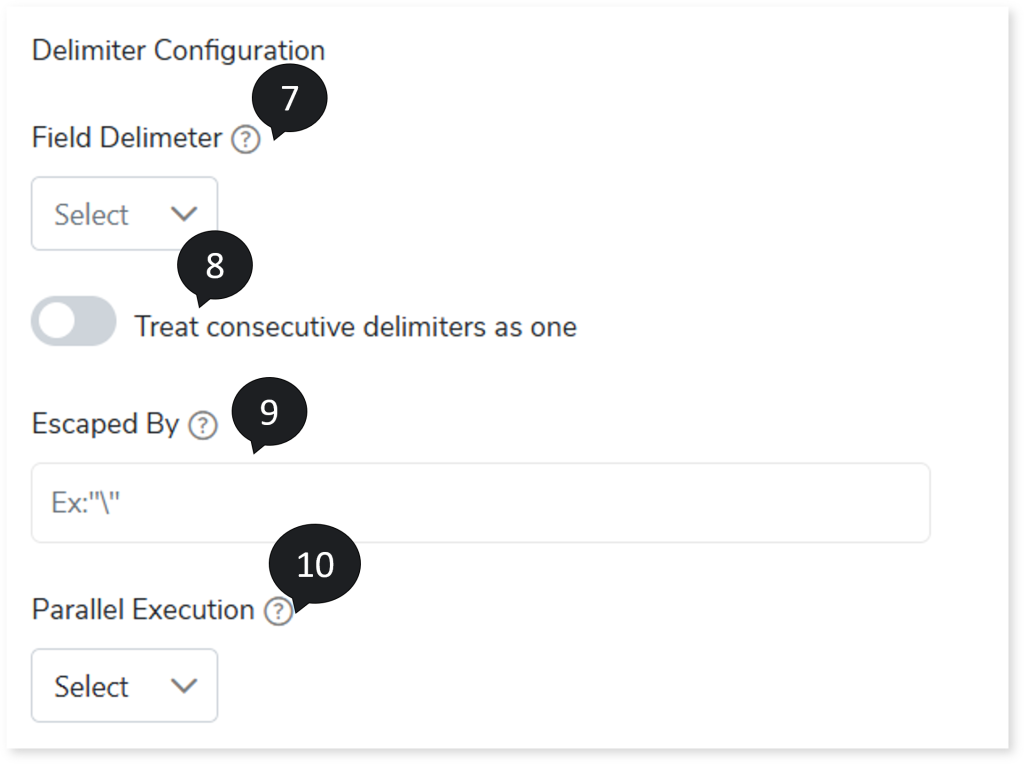
- In Field Delimiter, select the field separator that delimits the information across the columns in the input file, such as Hash {#}, Colon {:}, Comma {,} etc.
- To consider consecutive delimiters as one, turn on Treat consecutive delimiters as one toggle.
- In Escaped By, provide a delimiter to exclude the records before they are detected. For example, if you consider Inform,ation as a single input. Since the input (Inform,ation) contains a comma (delimiter), it will be treated as two separate inputs because the input contains a delimiter. To consider Inform,ation as a single input put the word in double quotes, such as “ Inform,ation”. Whenever the system encounters double quotes (the value provided in the Escaped by field), delimiter inside the double quotes is nullified.
- In Parallel Execution, specify the number of jobs that should be executed in parallel.
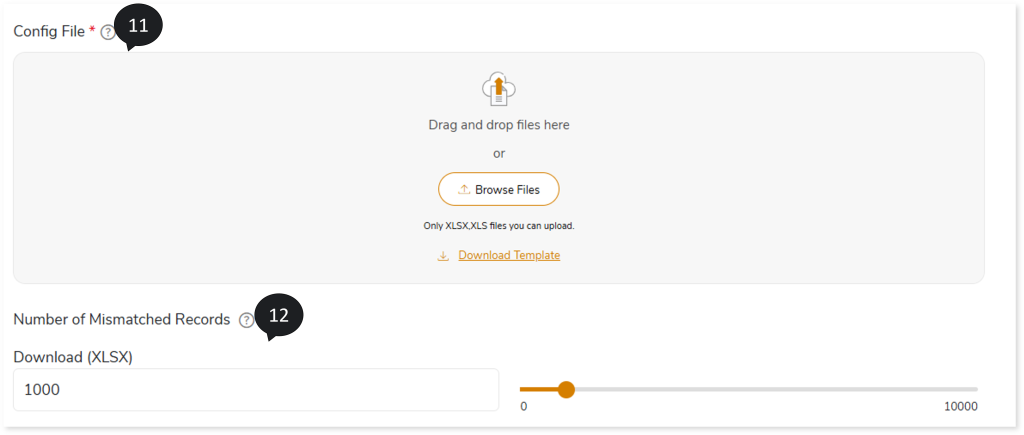
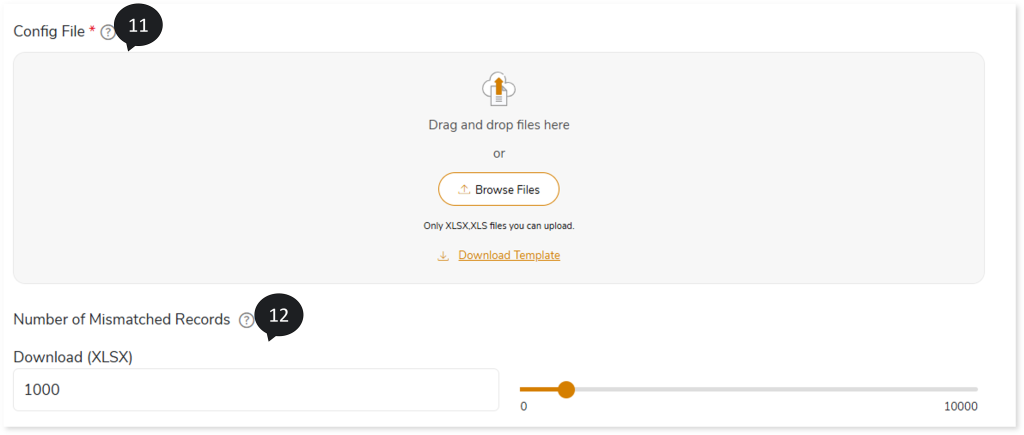
- In Config File, upload config rule file to configure various rules for specific tables or columns, such as trim, round (2), case insensitive, etc. For example, in case insensitive rules, the system ignores case sensitivity and recognizes the same value in the source and target. Refer Config rules table for more information.
- In Download (XLSX), provide the number of mismatched records that you want to download.
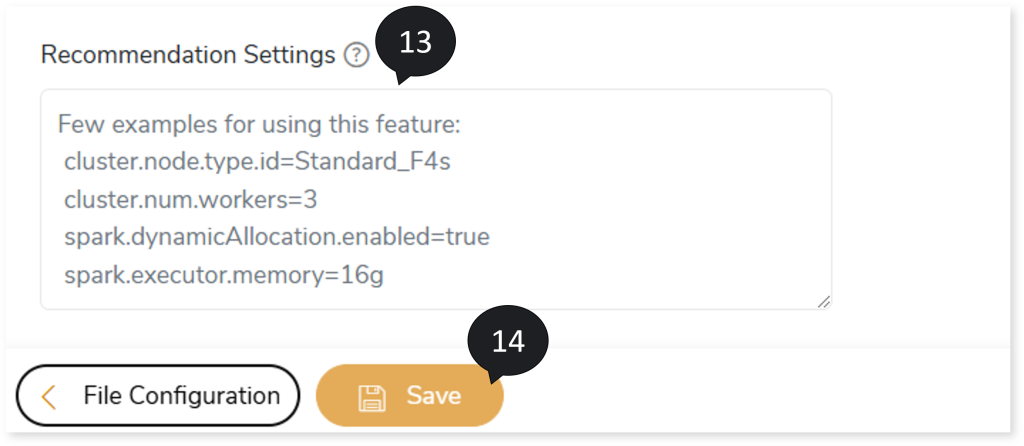
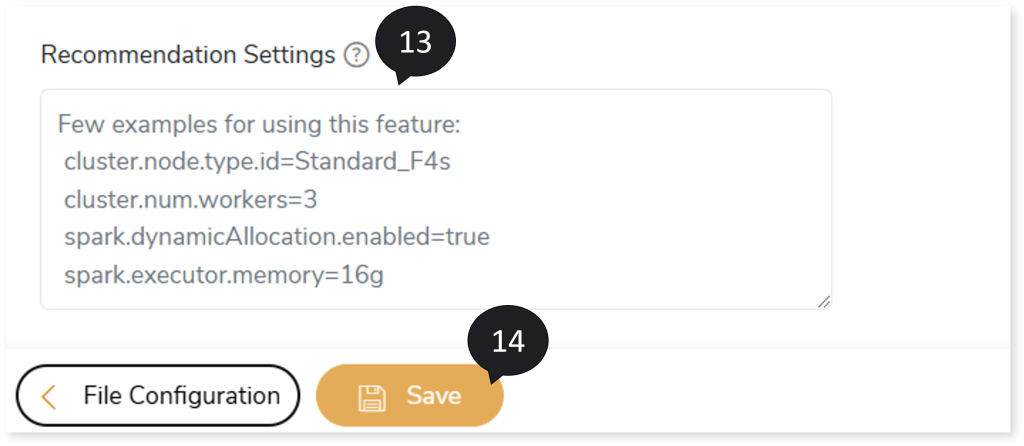
- In Recommendation Settings, provide cluster and spark related parameters to override the default settings. For example,
cluster.node.type.id=Standard_F4s
Cluster.num.workers=3
Spark.dynamicAllocation.enabled=true
Spark.executor.memory=16g
- Click Save to save the Validation Stage. The system displays an alerting snackbar pop-up to notify the success message when the Validation stage is successfully saved.
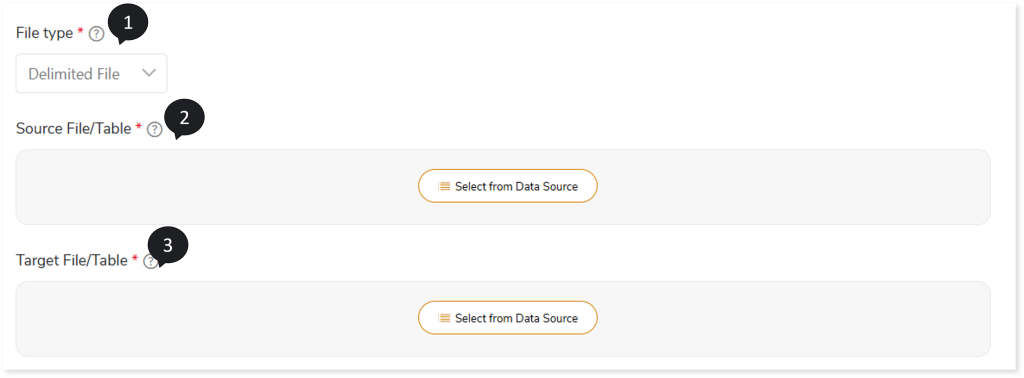
Configuring Data Validation: File and Table
To configure file and table validation, follow the steps below:
- In File Type, select Delimited File if the data in the file is separated by a field separator character such as Hash {#}, Colon {:}, Comma {,} etc.
- In Source File/Table, select the source file or table location which contains the original data. To do so, follow the below steps:
- Click Select From Data Source.
- Choose repository.
- Select data source.
- Click
 to save the source data source.
- In Target File/Table, select the target file or table location which contains the migrated data. To do so, follow the below steps:
- Click Select From Data Source.
- Choose repository.
- Select data source.
- Click
 to save the target data source.
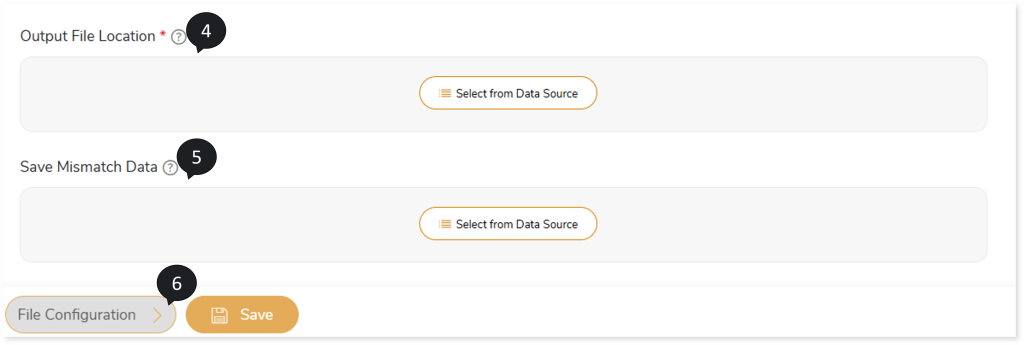
- In Output File Location, select the output file location where you need to save the output file after validation. To do so, follow the below steps:
- Click Select From Data Source.
- Choose repository.
- Select data source.
- Click
 to save the target data source.
- In Save Mismatch Data, select the location where the mismatch data needs to be saved after validation. To do so, follow the below steps:
- Click Select From Data Source.
- Choose repository.
- Select data source.
- Click
 to save the target data source.
- Click File Configuration to provide more details about the files.
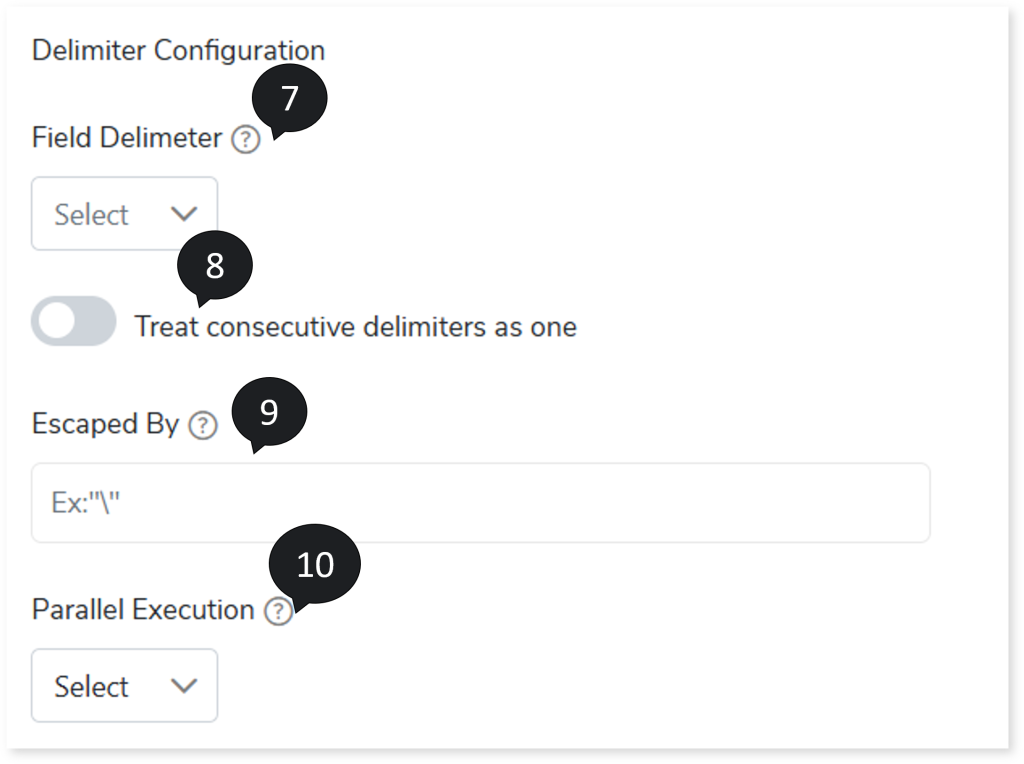
- In Field Delimiter, select the field separator that delimits the information across the columns in the input file, such as Hash {#}, Colon {:}, Comma {,} etc.
- To consider consecutive delimiters as one, turn on Treat consecutive delimiters as one toggle.
- In Escaped By, provide a delimiter to exclude the records before they are detected. For example, if you consider Inform,ation as a single input. Since the input (Inform,ation) contains a comma (delimiter), it will be treated as two separate inputs because the input contains a delimiter. To consider Inform,ation as a single input put the word in double quotes, such as “ Inform,ation”. Whenever the system encounters double quotes (the value provided in the Escaped by field), the delimiter inside the double quotes is nullified.
- In Parallel Execution, specify the number of jobs that should be executed in parallel.
- In Config File, upload a pre-defined template which instructs the system about what exactly needs to be validated from the complete dataset.
The configuration file contains two sheets:
- Template: Here you need to specify information about what exactly needs to be validated. In this sheet, you need to specify the source and target files or tables names, key columns, etc.
- Source File/ Table Name: Specify the source file or table names.
- Target File/ Table Name: Specify the target file or table names.
- Key Columns: Specify the column names that need to act as a key column. You can provide multiple column names by separating them with coma {,}. Key Columns act as base columns to perform cell-by-cell validation. If the key column is not selected, the system will perform cell-by-cell validation using the primary key in the source data.
- Column to be Validated: Specify the column names that need to be validated. If you have not specified any column name, validation will be performed on all the columns.
- Column to be skipped: Specify the column names that need to be excluded from validation.
- Functions: Specify the required aggregate functions to perform validation on the specified dataset.

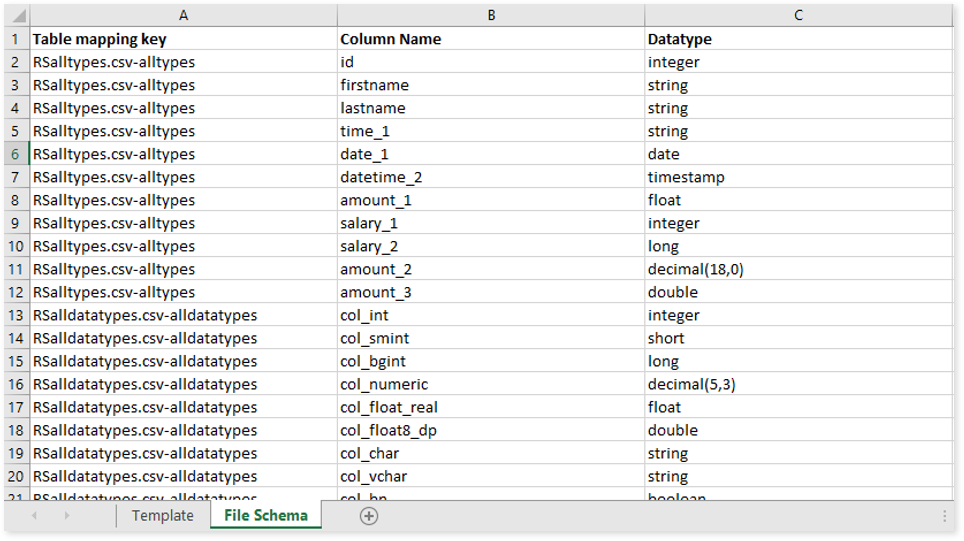
- File Schema: This is used to specify the data types for all columns.
Files do not specify the structure of datasets or schemas, whereas tables do. To obtain accurate results when comparing both file and table datasets, you must specify the data types for all columns in the File Schema.
- Table mapping key: Provide a table mapping key. It should be in <source file/table_name-target_file/table_name> format.
- Column Name: Lists all the columns available in the source and target.
- Datatype: Specify the datatypes that need to be considered for the corresponding column name.
- In Download (XLSX), provide the number of mismatched records that you want to download.
- In Recommendation Settings, provide cluster and spark related parameters to override the default settings. For example,
cluster.node.type.id=Standard_F4s
Cluster.num.workers=3
Spark.dynamicAllocation.enabled=true
Spark.executor.memory=16g
- Click Save to save the Validation Stage. The system displays an alerting snackbar pop-up to notify the success message when the Validation stage is successfully saved.
- Click
 to execute the integrated or standalone pipeline. The pipeline listing page opens and displays the pipeline status as Running. When execution is successfully completed, the status changes to Success.
- Click the pipeline card to see reports.
To view the Data Validation Stage report, visit Data Validation Report.
Next:
Cell-by-cell validation