Configuring Migration Stage
In the Migration stage, schema and data from legacy data sources are migrated to modern cloud-based platforms. Double-click the Migration stage to access the configuration page.
In this Topic:
Overview
In this section, you can customize the name for the Migration stage and can give a suitable description as required. By default, Migration is provided in the Name field. Provide a meaningful name and a description that helps you to understand its purpose and scope.

Transform
In this section, you can define the source and target for the migration process. Typically, the source and target data sources are uploaded from the repository at this stage. Before uploading the data source, ensure that you have already created the repository and the data sources for the source and target.
To create a metadata repository and a data source, see Creating Repository (Repo) and Creating Data Source.
To configure the Migration stage, follow the below steps:
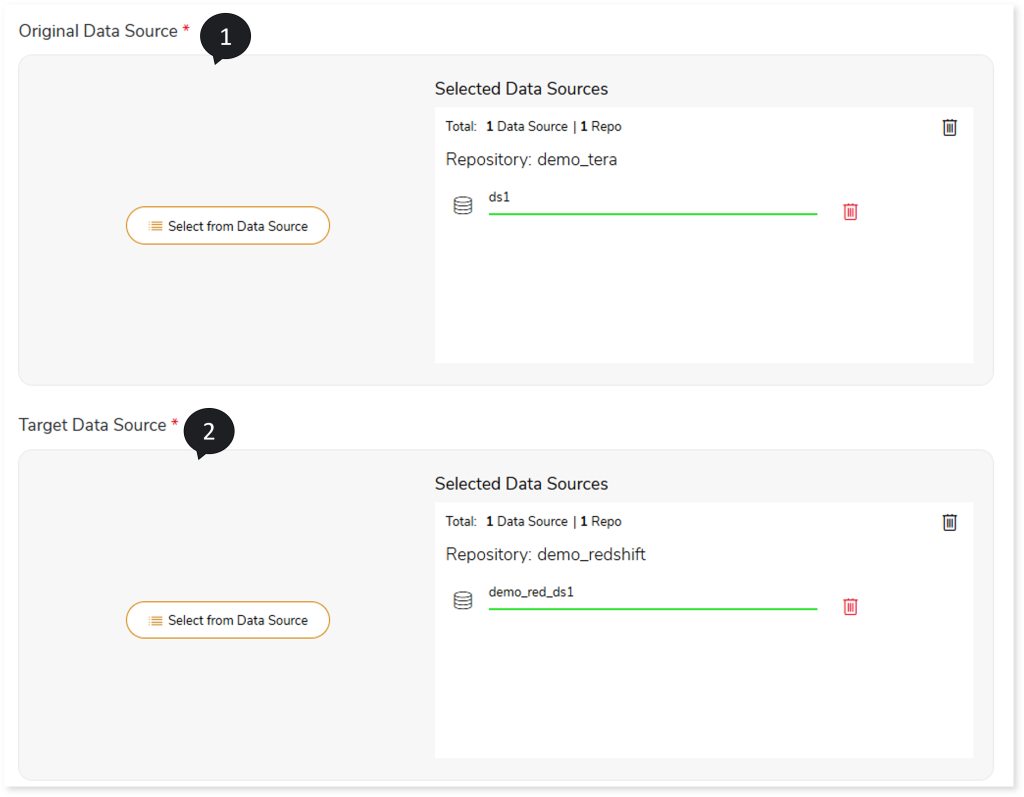
- To upload the data source that you want to migrate, follow the below steps:
- Click Original Data Source.
- Choose repository.
- Select data source.
- Click
 to save the source data source.

- To upload the Target Data Source, follow the below steps:
- Click Target Data Source.
- Choose repository.
- Select data source.
- Click
 to save the target data source.

- Select a Storage Data Source if your target data source is Snowflakes, Redshift, or Databricks. The Storage Data Sources are:
- Amazon S3
- Azure Data Lake Storage
To upload the Storage Data Source, follow the below steps:
- Click Storage Data Source.
- Choose repository.
- Select data source.
- Click to save the target data source.

- In IAM Role, assign an IAM Role to the Redshift repository to ensure security.
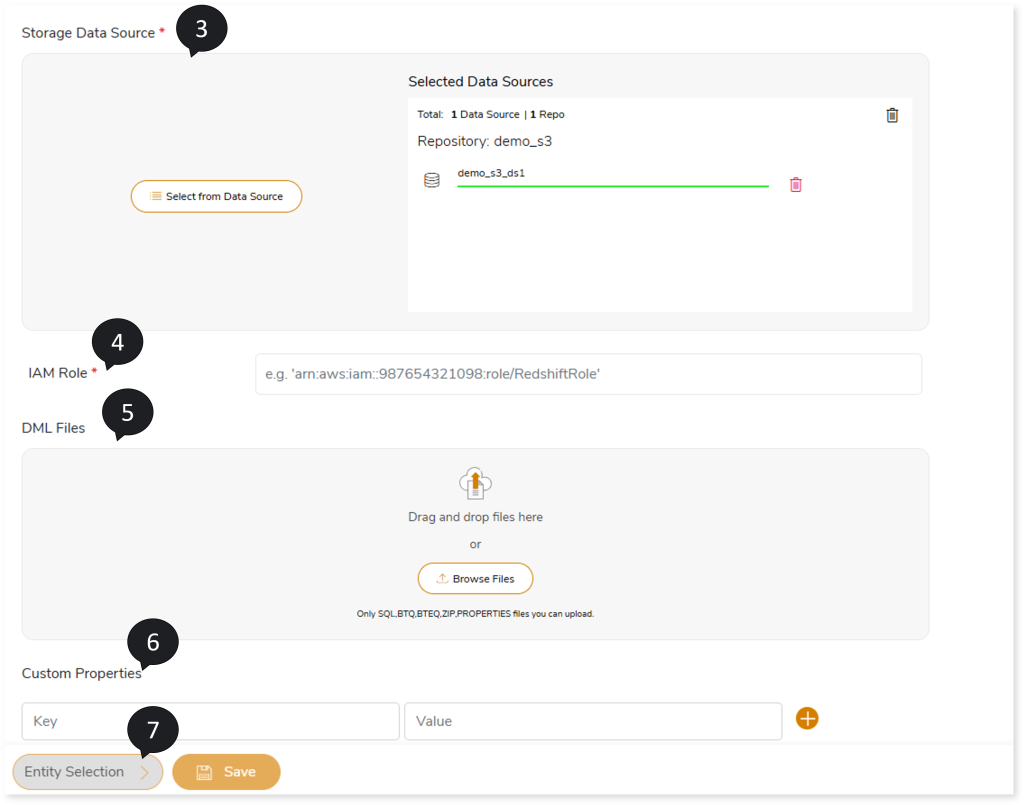
- In DML Files, upload DML files based on which the system automatically categorizes tables and views for migration.
- In Custom Properties, enter the keys and values. For instance, through custom properties, you can add spark engine related details of another machine. To do so, you need to provide server details like host name, host username, host password, host type (such as EMR), and host mode (such as local or yarn).
- Select Entity Selection to configure the entities.
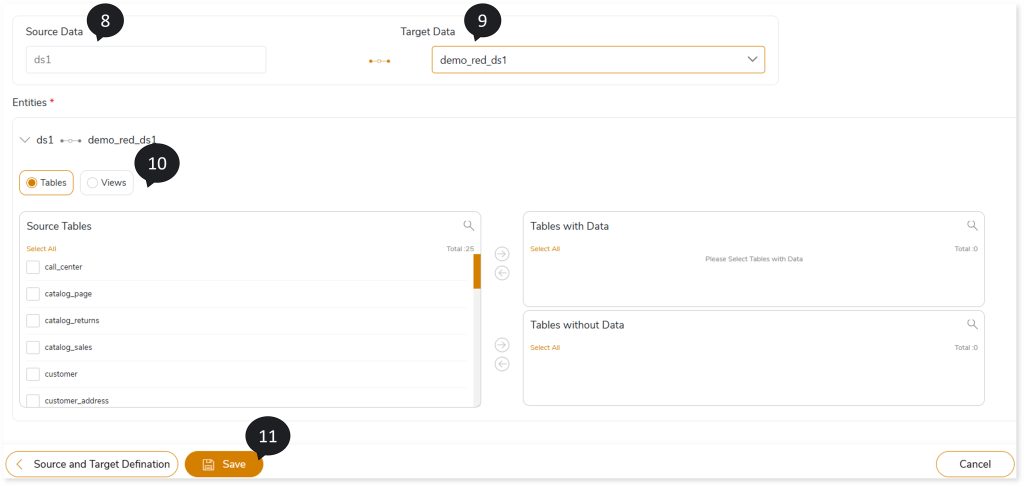
- In Source Data, select the required data source for migration.
- In Target Data, select the target data source to map with the source entities.
- In Entities, select the entities such as Table or View that you need to migrate. To configure the tables for migration, follow the steps below.
- Select Tables.
- Select the required tables that you need to migrate with data from the Source Tables card.
- Click
 to move the selected tables to the Tables with Data card.

- Select the required tables that you need to migrate without data from the Source Tables card.
- Click
 to move the selected tables to the Tables without Data card.

Similarly, configure the views for migration, follow the steps below:
- Select Views.
- Select the required views that you need to migrate to the target platform as tables from the Warehouse Views card.
- Click
 to move the selected views to the Views as Tables card.
- Select the required views that you need to migrate to the target platform as views from the Source Tables card.
- Click
 to move the selected views to the Views as Views card.
- Click Save to save the Migration stage. When a Migration stage is successfully saved, the system displays an alerting snackbar pop-up to notify the success message.
- Click
 to execute the integrated or standalone pipeline. Clicking
  (Execute) navigates you to the pipeline listing page which shows your pipeline status as Running state. It changes its state to Success when it is completed successfully.
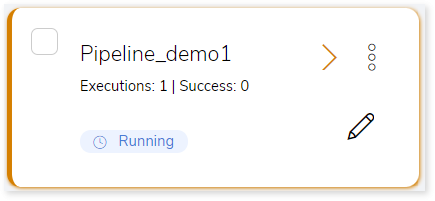
- Click on your pipeline card to see reports.
To view the Migration Stage report, visit Migration Report.
Schema Optimization
Schema describes the functionalities of the data sources, schemas, entities, and how they relate to each other. It also describes how the data is stored, partitioned, or grouped to perform any task. You can achieve the best performance with good data model optimization.
Schema Optimization for Hive
To improve the performance, schema optimization strategies include Partitioning, Bucketing, Clustering, and splitting strategies.
To configure schema strategies:
- Select
 on the preferred table in the Tables with Data or Tables without Data card.

- Select the required columns and click
 to move the selected columns to the Partition By or Cluster By card.
- In Split By, select the column to split the table’s data using the primary key.
- To group the clusters, turn on the Allow Bucketing toggle.
- In No. of Buckets, specify the number of groups for clustering
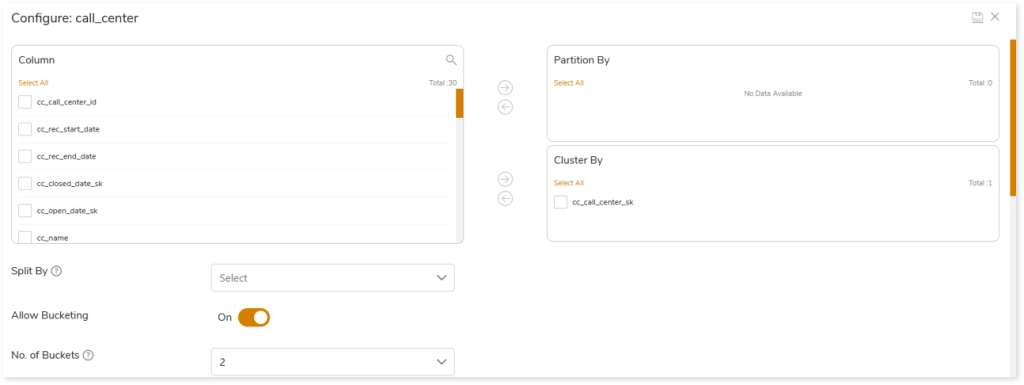
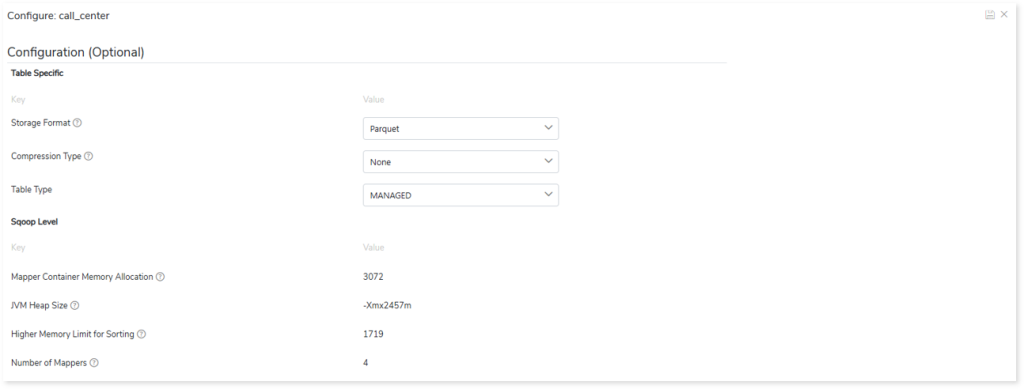
- In addition, you can also configure table specific and sqoop level for the tables you want to migrate. In table specific, you can define the storage format, compression type, and table type.
- In Storage Format, specify data storage format for the target tables such as ORC, Parquet, and Text.
- ORC: ORC stands for Optimized Row Columnar. Data can be stored more efficiently by reducing the size of the original data by up to 75%.
- Parquet: It handles column storage file formats, where data is encoded and stored by columns.
- Text: Stores text data.
- In Compression Type, specify the type of compression technique that needs to be applied to the target tables, such as Snappy (data compression and decompression library), glib, or None.
- In Table Type, specify the table type such as MANAGED or EXTERNAL.
- MANAGED: Table data and schema are managed and controlled by Hive.
- EXTERNAL: Table data and schema are loosely coupled with Hive.
- In Sqoop Level, define the sqoop level memory-based parameters such as Mapper Container Memory Allocation, JVM Heap Size, and Higher Memory Limit for Sorting for the data migration. Scoop level helps to import data in parallel from the data sources. By setting the Number of Mappers parameter, you can define the number of parallel data processing operations.
- Mapper Container Memory Allocation: The default value is 3072.
- JVM Heap Size: The default value is -Xmx2457m.
- Higher Memory Limit for Sorting: The default value is 1719.
- Number of Mappers: The default value is 4. It is a sqoop level parameter for parallel data processing
- Click
 to update the changes.
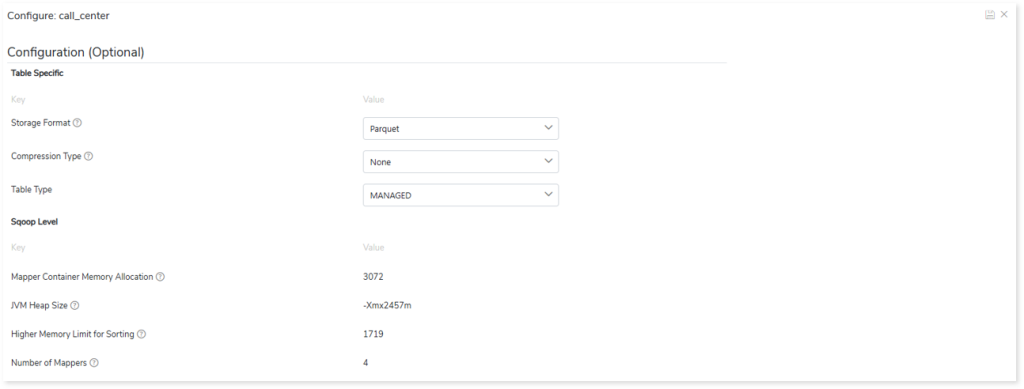
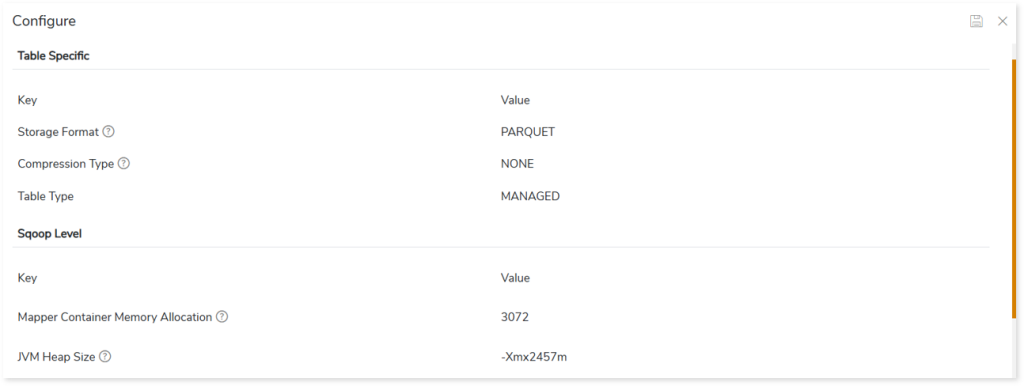
Additionally, click  from the Entities card to configure table specific and sqoop level for the tables you want to migrate.

- Storage Format: Data storage format for the target tables.
- Compression Type: The type of compression technique that needs to be applied to the target tables, such as Snappy, glib, None.
- Sqoop Level: It helps to import data in parallel from the data sources. By setting the Number of Mappers parameter, you can define the number of parallel data processing operations. In addition, you can define Sqoop level parameters such as Mapper Container Memory Allocation, JVM Heap Size, and Higher Memory Limit for Sorting for the data migration.
|
Table Specific |
|
Key |
Value |
|
Storage Format |
- ORC: ORC stands for Optimized Row Columnar. Data can be stored more efficiently by reducing the size of the original data by up to 75%
- Parquet: It handles column storage file formats, where data is encoded and stored by columns
- Text: Stores text data
|
|
Compression Type |
- None
- glib: It is a library for data compression
- Snappy: It is a data compression and decompression library
|
|
Transactional |
|
|
Table Type |
- Managed: Table data and schema are managed and controlled by Hive.
- External: Table data and schema are loosely coupled with Hive
|
|
Sqoop Level |
|
Mapper Container Memory Allocation |
The default value is 3072. It is a sqoop memory-level parameter |
|
JVM Heap Size |
The default value is -Xmx2457m. It is a sqoop memory-level parameter |
|
Higher Memory Limit for Sorting |
The default value is 1719. It is a sqoop memory-level parameter |
|
Number of Mappers |
The default value is 4. It is a sqoop level parameter for parallel data processing |
Schema Optimization for Azure
To configure schema strategies:
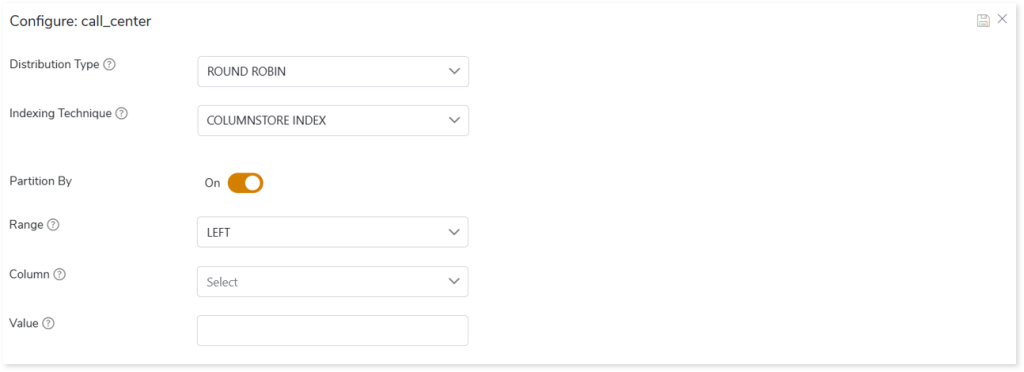
- Select
 on the preferred table in the Tables with Data or Tables without Data card.

- In Distribution Type, select the table distribution options for the best distribution of data. The Distribution Types are:
- HASH: Assigns each row to one distribution by hashing the value stored in distribution_coulumn_name.
- ROUND ROBIN: Distributes the rows evenly across all the distributions in a round-robin fashion.
- REPLICATE: Stores one copy of the table on each compute node.
- Choose the Indexing Technique. The Indexing Technique includes:
- COLUMNSTORE INDEX: Stores the table as a columnstore index.
- COLUMNSTORE INDEX ORDER: Stores the table as a columnstore index order.
- HEAP: A heap refers to a table without a clustered index. Tables that are stored in heaps can have one or more nonclustered indexes. The heap stores data without specifying an order.
- CLUSTERED INDEX: Stores the table as a clustered index with one or more key columns.
- To divide the data of table into different directories for efficient data retrieval, turn on the Partition by toggle.
- In Range, select Left or Right as the boundary value.
- Left specifies the boundary value belongs to the partition on the left (lower values). The default value is Left.
- Right specifies the boundary value belongs to the partition on the right (higher values).
- In Column, select the column that Synapse needs to use to partition the rows. This column can be of any data type. Synapse sorts the partition column values in ascending order.
- In Value, specify the boundary values for the partition. It is a constant expression. It can’t be NULL.
- Click
 to update the changes.
Schema Optimization for Snowflake
To configure schema strategies:
- Select
 on the preferred table in the Tables with Data or Tables without Data card.

- Select the required columns and click
 to move the selected columns to the Partition By or Cluster By card.
- Click
 to update the changes.

Schema Optimization for Databricks Lakehouse
To configure schema strategies:
- Select
 on the preferred table in the Tables with Data or Tables without Data card.

- Select the required columns and click
 to move the selected columns to the Partition By or Cluster By card.
- Click
 to update the changes.

Additionally, you can configure table specific and sqoop level for the tables you want to migrate. To do so:
- Click
 from the Entities card.

- In Table Specific, you can define the storage format, compression type, and table type.
- In Storage Format, specify data storage format for the target tables such as ORC, Parquet, and Text.
- ORC: ORC stands for Optimized Row Columnar. Data can be stored more efficiently by reducing the size of the original data by up to 75%.
- Parquet: It handles column storage file formats, where data is encoded and stored by columns.
- Text: Stores text data.
- In Compression Type, specify the type of compression technique that needs to be applied to the target tables, such as Snappy (data compression and decompression library), glib, or None.
- In Table Type, specify the table type such as MANAGED or EXTERNAL.
- In Sqoop Level, define the sqoop level memory-based parameters such as Mapper Container Memory Allocation, JVM Heap Size, and Higher Memory Limit for Sorting for the data migration. Scoop level helps to import data in parallel from the data sources. By setting the Number of Mappers parameter, you can define the number of parallel data processing operations.
- Mapper Container Memory Allocation: The default value is 3072.
- JVM Heap Size: The default value is -Xmx2457m.
- Higher Memory Limit for Sorting: The default value is 1719.
- Number of Mappers: The default value is 4. It is a sqoop level parameter for parallel data processing
- Click
 to update the changes.
Schema Optimization for Google Cloud BigQuery
To configure schema strategies:
- Select
 on the preferred table in the Tables with Data or Tables without Data card.

- Select the required columns and click
 to move the selected columns to the Partition By or Cluster By card.
- In Split By, select the column to split the table’s data using the primary key.
- To group the clusters, turn on the Allow Bucketing toggle.
- In No. of Buckets, specify the number of groups for clustering

- In addition, you can also configure table specific and sqoop level for the tables you want to migrate. In table specific, you can define the storage format, compression type, and table type.
- In Storage Format, specify data storage format for the target tables such as ORC, Parquet, and Text.
- ORC: ORC stands for Optimized Row Columnar. Data can be stored more efficiently by reducing the size of the original data by up to 75%.
- Parquet: It handles column storage file formats, where data is encoded and stored by columns.
- Text: Stores text data.
- In Compression Type, specify the type of compression technique that needs to be applied to the target tables, such as Snappy (data compression and decompression library), glib, or None.In Table Type, specify the table type such as MANAGED or EXTERNAL.
- In Sqoop Level, define the sqoop level memory-based parameters such as Mapper Container Memory Allocation, JVM Heap Size, and Higher Memory Limit for Sorting for the data migration. Scoop level helps to import data in parallel from the data sources. By setting the Number of Mappers parameter, you can define the number of parallel data processing operations.
- Mapper Container Memory Allocation: The default value is 3072.
- JVM Heap Size: The default value is -Xmx2457m.
- Higher Memory Limit for Sorting: The default value is 1719.
- Number of Mappers: The default value is 4. It is a sqoop level parameter for parallel data processing
- Click
 to update the changes.

Output
The output of the Migration stage is the migration of data, schema, and views to modern cloud-based data platforms. You can view the report from the pipeline listing after the execution of this stage.

In this section, you can configure the output of this stage for navigation to a further stage. By default, the Output configuration is set to Stop if the migration is not 100%, which can be modified as required. To modify the Output configuration, choose:
- Continue: To continue the transformation for navigation to the next stage, even if the migration is not 100%.
- Error: To throw an error if the migration is not 100%.
- Pause: To cease the pipeline state to a further stage if the migration is not 100%. If the pipeline status is set to pause when you encounter any issue or the migration stage fails, you can manually edit the execution and re-run it.
- Stop: To stop the pipeline state if the migration is not 100%. If the pipeline status is configured as Stop, the pipeline execution will stop whenever the migration stage fails, and you need to reconfigure the pipeline to execute the stage.